Here are general tips for playing the Empire Campaign in Warhammer: Mark of Chaos on HARD Difficulty. A list of all our Warhammer: Mark of Chaos articles can be found here.
We won't be hand-holding you through absolutely everything, but instead just give tips on situations that we found tricky or that you might not have considered.
Chapter 2: The Hosts of Ulthuan
Mission 2: Muster the Warhost
Overview
This is a pretty brutal mission because you don't have any really good front line units. If Aurelion becomes seriously hurt early in the mission, you may end up having to spend your Spearmen and Silver Helms for front line blocking, and none of the regiments start with armour upgrades.
- Even the Spearmen, who supposedly have extra Armour when they use their shield stance, die really fast -- faster than Empire Swordsmen using Shield Parry.
- Try to be careful with Aurelion and how you use her to shield your units so that the Archers can win fights for you.
- Use Fire Arrows against any non-daemon units to reduce contact time with Aurelion.
- If possible, use Aurelion to draw the enemy away from your archers instead of simply standing in front and engaging them in melee. This can buy you a little bit more time to break their morale with Fire Arrows.
- Aurelion has a long sight range and good range with her Wrath of Khaine spell, which you should maximize along with Spell Focus. Use her to sight for the Bolt Thrower or pull enemies with her spells.
- For the final fight, she can't really stand in front. Put her behind and use her spells. Select one regiment to be up front while your archers try to win it for you.
Walkthrough
- Wait for the Marauders from shore nearby, behind the trees.
- Wait for Marauders near the Chaos Totem to move away.
- If you hit the totem, they will beeline for you.
- When they turn to walk away, rush for the totem and destroy it in melee. With luck, the archers will awaken and help you fight them before they turn around, see you, and come for you.
- Take point with Aurelion and destroy the Marauders in path to the west guarding some gold. You should be able to do this with no losses, and possibly without ever letting Aurelion get into combat if your archers can break their morale early with Fire Arrows.
- Move Aurelion and archers toward the path up into the mountains.
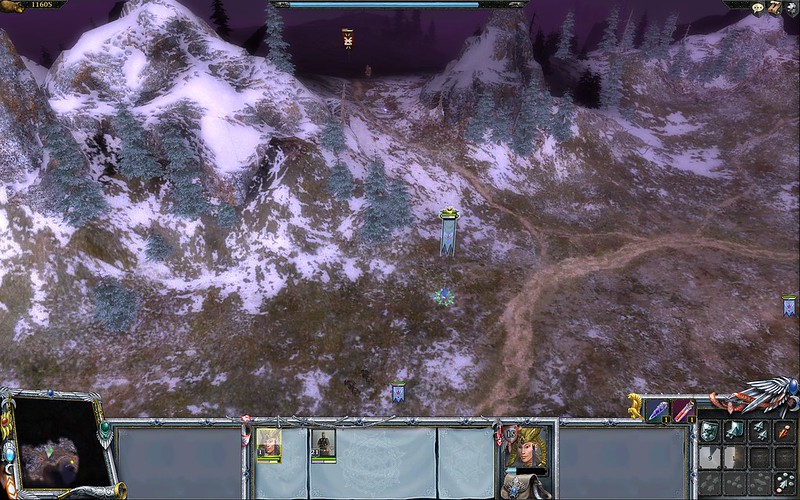
- Typically you need to be on the plateau to see the knights, but not always. See the picture below. The sooner you see and target them, the longer lead time you have to shoot them. See the
- Take point with Aurelion. Hopefully the knights will quickly get repelled by the Fire Arrows and each time they come you can get them to flee quickly.
- After the Chaos Knights are clear, inch up and find the demons. Lead them out and along the base of the mountain to give archers more time to shoot. They have 2-damage attacks and explosions and can drain Aurelion's HP too early in the mission.
- From the plateau where you take control of the Bolt Thrower, inch along the path to the east until you see the Axe Throwers. Get your positions ready and hit them with the bolt thrower. Marauders will join them. Have the bolt thrower and Aurelion focus on the Axe Throwers while the archers focus on the Marauders. Destroy them, then head back down the mountain to get the spearmen who are useless but which you may need to take point instead of Aurelion, especially during the final assault.
- Locate and attack the knights guarding the pass to the Silver Helms that you may have seen when you attacked the Axe Throwers. Come at them from the direction of the beach instead of letting them close quickly at you from the pass earlier. Possibly lead them away from your regiments with Aurelion so your archers can hopefully destroy their morale and make them flee.
- Assemble back on the ridge where you found the ballista.
- Make sure the ballista can shoot at the bend where the Chaos forces will have to turn to get up to the ridge.
- As soon as you hit one, all will mobilize. Put the spearmen up front and try to safely support them with the ballista shooting at units just behind the front lines. Remember to turtle the Spearmen in their shield formation that supposedly gives them more armor when facing the forward direction.
We came through this mission with just 2 Spearmen left after the battle, and we also lost 2 archers due to the Axe of Doom throw from the Chaos Champion. It then cost us about 15000 to outfit the elven army for the next mission.
Comments
Post a Comment